Introduction
Torado – The Ultimate Multipurpose HTML5 Template
Template Features:
- 101+ Ready Projects. Click to View Demo
- 298+ Home Page Demos
- 2810+ Inner Pages
- 179+ Header Styles
- 126+ Footer Styles
- 10569+ UI Sections
- 3557+ Elements
- Built on Bootstrap 5.x and Sass – Ensures modern development practices and easy customization.
- AJAX Contact Form – For seamless form submissions without page reload, enhancing user experience and interaction.
- MailChimp Subscriptions – For easy email list integration and automated newsletter sign-ups using MailChimp services.
- npm – For managing project dependencies and installing packages to streamline development and build processes.
- Fully Responsive Layout – Works perfectly on desktops, laptops, tablets, and mobile devices.
- Easy to Customize and Expands – Clean and well-structured code for hassle-free modifications.
- Swiper Slider & Owl Carousel – Provides a smooth and responsive slider experience.
- MixItUp 3 – For smooth animated filtering and sorting of portfolio, gallery, or product items.
- Integrated with FontAwesome, RemixIcon, Phosphoricons, Flaticon, Boxicons, and IcoFont – High-quality icons to enhance the UI.
- scrollCue, GSAP, and AOS Animation – Engaging scroll-based animations for interactive elements.
- Fullscreen Lightbox and Magnific Popup – Elegant image/video previews for better visualization.
- Light/Dark Mode – For adding smooth, scroll-triggered animations that enhance user engagement and visual appeal.
- Google Fonts – For elegant, scalable, and consistent typography across all browsers and devices.
- Rich Text Editor – For intuitive WYSIWYG content creation with formatting, media embeds, and more.
- Date/Time Picker – For easy and user-friendly date and time selection in forms and booking interfaces.
- Table – For organized and responsive data display with sorting, pagination, and styling support.
- Gallery – For showcasing images in an interactive, visually appealing, and filterable layout.
- Calendar – For scheduling, event display, and date-based interaction with a clean visual interface.
- W3 Validated – Clean, semantic, and SEO-friendly HTML code.
- Cross-browser Compatible – Works flawlessly on all major browsers.
- Retina Ready – Crisp and clear visuals on high-resolution screens.
- Smooth Animation – Enhances user experience with elegant transitions.
- Easily Customizable – Well-commented code to allow easy modifications.
- Well Documented – Detailed guide for seamless installation and customization.
Getting Started
The template folder torado-the-ultimate-multipurpose-html5-template.zip is available inside the downloaded ZIP file. After unzipping the downloaded ZIP file, you can choose the project based on the category name.
Upload the project files to the server using an FTP client such as FileZilla.
Files Edit & Upload:
Individual pages can be customized by opening in a code editor such as VS Code. Once all the customization completed then to make the website live you need to upload the updated project files to the hosting server for your own domain. The files can be uploaded using FTP client such as FileZilla.
HEAD CSS Structure
You will find the CSS files in each template, which are loaded inside the Head section:
<!-- Link of CSS Files -->
<link rel="stylesheet" href="assets/css/animate.min.css">
<link rel="stylesheet" href="assets/css/swiper-bundle.min.css">
<link rel="stylesheet" href="assets/css/flaticon_mycollection.css">
<link rel="stylesheet" href="assets/css/remixicon.css">
<link rel="stylesheet" href="assets/css/scrollCue.min.css">
<link rel="stylesheet" href="assets/css/style.css">
<link rel="stylesheet" href="assets/css/responsive.css">
Javascript Structure
You will find the JS files in each template, loaded before the end of the HEAD or BODY Section:
<!-- Link of JS Files -->
<script src="assets/js/jquery.min.js"></script>
<script src="assets/js/bootstrap.bundle.min.js"></script>
<script src="assets/js/swiper-bundle.min.js"></script>
<script src="assets/js/fslightbox.min.js"></script>
<script src="assets/js/scrollCue.min.js"></script>
<script src="assets/js/simpleParallax.min.js"></script>
<script src="assets/js/smooth-scroll.min.js"></script>
<script src="assets/js/gsap.min.js"></script>
<script src="assets/js/ScrollTrigger.min.js"></script>
<script src="assets/js/SplitText.min.js"></script>
<script src="assets/js/TweenMax.min.js"></script>
<script src="assets/js/main.js"></script>
Do You Want Real Demo Images?
Due to the Envato Policy, we are unable to include demo images inside the download bundle so for demo images please submit a ticket in https://support.envytheme.com/
HTML Structure
The Torado is a responsive template and is based on the Bootstrap Framework. For more information you can check the Bootstrap CSS.
The general template structure is the same throughout the template and each of the part is under a section with a section id name. Here is the general structure:
<!-- Start Features Area -->
<div class="features-area ptb-120">
    <div class="container">
        <div class="row justify-content-center g-5" data-cues="slideInUp" data-duration="1000">
            <div class="col-lg-4 col-md-6">
                <div class="features-card wrap1">
                    <div class="top section-title-animation animation-style1">
                        <img src="assets/images/features1.png" alt="image">
                        <h3 class="title-animation">Quality Design</h3>
                    </div>
                    <p>Quality is our top priority. We use state-of-the-art printing technology and premium materials to crafted with precision and care.</p>
                </div>
            </div>
            <div class="col-lg-4 col-md-6">
                <div class="features-card wrap2">
                    <div class="top section-title-animation animation-style1">
                        <img src="assets/images/features2.png" alt="image">
                        <h3 class="title-animation">Professional Adviser</h3>
                    </div>
                    <p>The possibilities are endless. From custom apparel and accessories, we offer a wide range of products that you can tailor.</p>
                </div>
            </div>
            <div class="col-lg-4 col-md-6">
                <div class="features-card wrap3">
                    <div class="top section-title-animation animation-style1">
                        <img src="assets/images/features3.png" alt="image">
                        <h3 class="title-animation">Speed & Reliability</h3>
                    </div>
                    <p>With our fast turnaround times and reliable shipping options, getting your creations delivered to your doorstep has never been easier.</p>
                </div>
            </div>
        </div>
    </div>
</div>
<!-- End Features Area -->
Responsive Breakpoints
The Torado is a responsive template and is based on the Bootstrap Framework. For more information you can check the Bootstrap CSS.
/* Max width 767px */
@media only screen and (max-width : 767px) {

}

/* Min width 576px to Max width 767px */
@media only screen and (min-width : 576px) and (max-width : 767px) {

}

/* Min width 768px to Max width 991px */
@media only screen and (min-width : 768px) and (max-width : 991px) {

}

/* Min width 992px to Max width 1199px */
@media only screen and (min-width : 992px) and (max-width : 1199px) {

}

/* Min width 1200px to Max width 1399px */
@media only screen and (min-width: 1200px) and (max-width: 1399px) {

}

/* Min width 1400px to Max width 1500px */
@media only screen and (min-width: 1400px) and (max-width: 1500px) {

}

/* Min width 1600px */
@media only screen and (min-width: 1600px) {

}
Contact Form Strong
The Contact form html code coming with jQuery form validation. Also, it's included a .php file(form-process.php) for AJAX based email sending! HTML code example is similar to followings:
<form id="contactForm">
    <div class="row">
        <div class="col-lg-6 col-md-6 col-sm-6">
            <div class="form-group">
                <input type="text" name="name" class="form-control" id="name" required data-error="Please enter your name" placeholder="Eg: Sarah Taylor">
                <div class="help-block with-errors"></div>
            </div>
        </div>
        <div class="col-lg-6 col-md-6 col-sm-6">
            <div class="form-group">
                <input type="email" name="email" class="form-control" id="email" required data-error="Please enter your email" placeholder="[email protected]">
                <div class="help-block with-errors"></div>
            </div>
        </div>
        <div class="col-lg-6 col-md-6 col-sm-6">
            <div class="form-group">
                <input type="text" name="phone_number" class="form-control" id="phone_number" required data-error="Please enter your phone number" placeholder="Enter your phone number">
                <div class="help-block with-errors"></div>
            </div>
        </div>
        <div class="col-lg-6 col-md-6 col-sm-6">
            <div class="form-group">
                <input type="text" name="msg_subject" class="form-control" id="msg_subject" placeholder="Enter your subject" required data-error="Please enter your subject">
                <div class="help-block with-errors"></div>
            </div>
        </div>
        <div class="col-lg-12 col-md-12 col-sm-12">
            <div class="form-group">
                <textarea name="message" id="message" class="form-control" cols="30" rows="6" required data-error="Please enter your message" placeholder="Enter message..."></textarea>
                <div class="help-block with-errors"></div>
            </div>
        </div>
        <div class="col-lg-12 col-md-12 col-sm-12">
            <button type="submit" class="default-btn"><i class='bx bx-paper-plane'></i> Send Message</button>
            <div id="msgSubmit" class="h3 text-center hidden"></div>
            <div class="clearfix"></div>
        </div>
    </div>
</form>
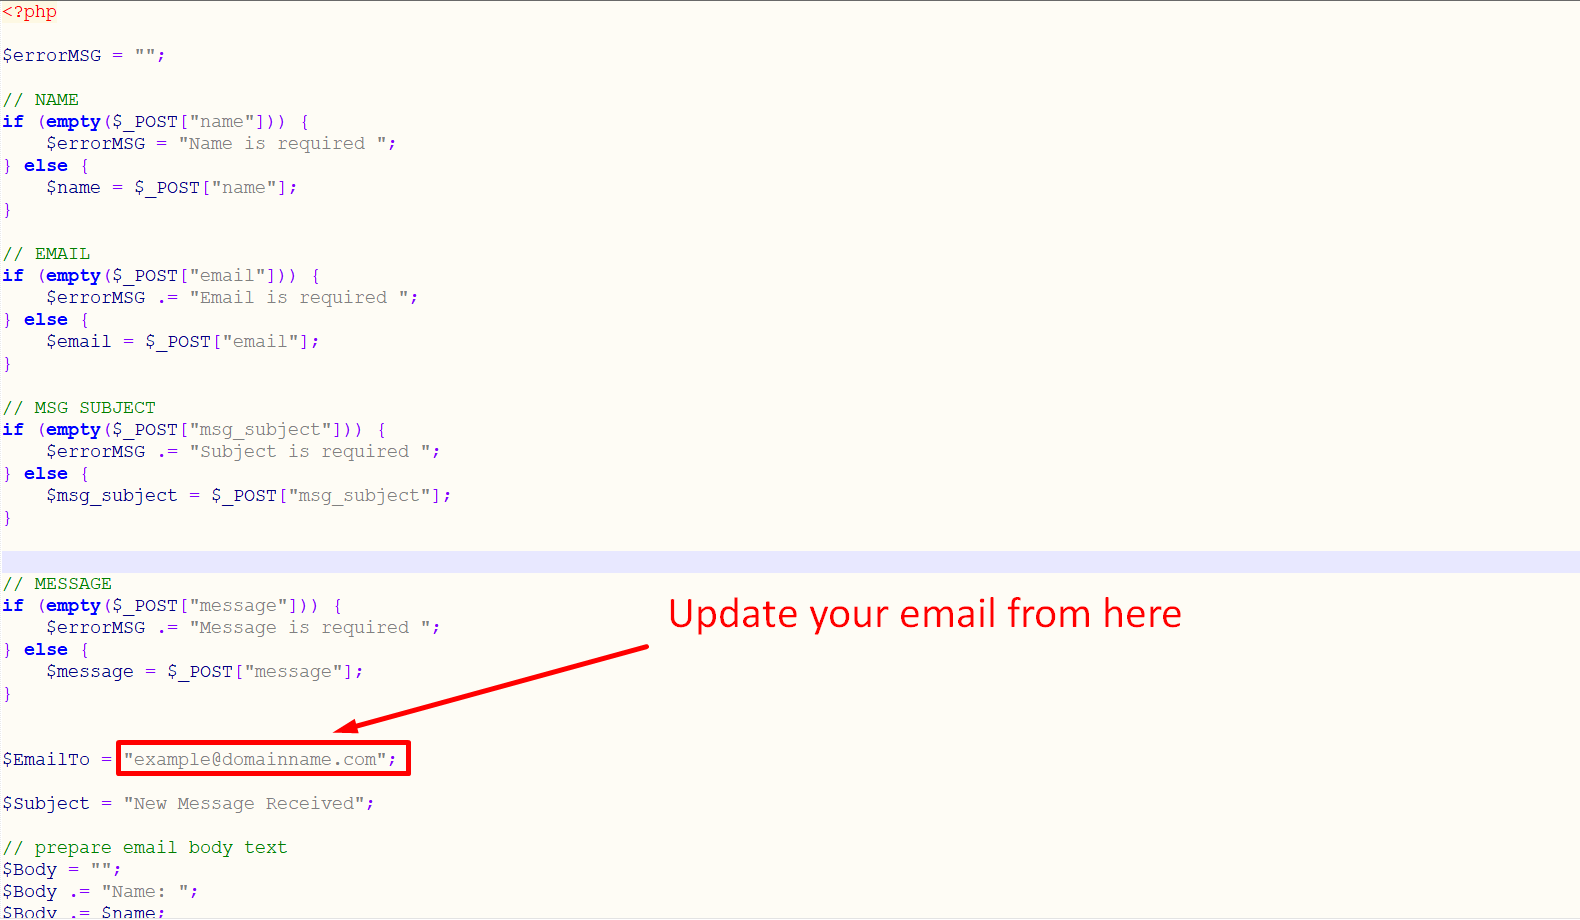
AJAX Contact Form
File location: assets/php/form-process.php file
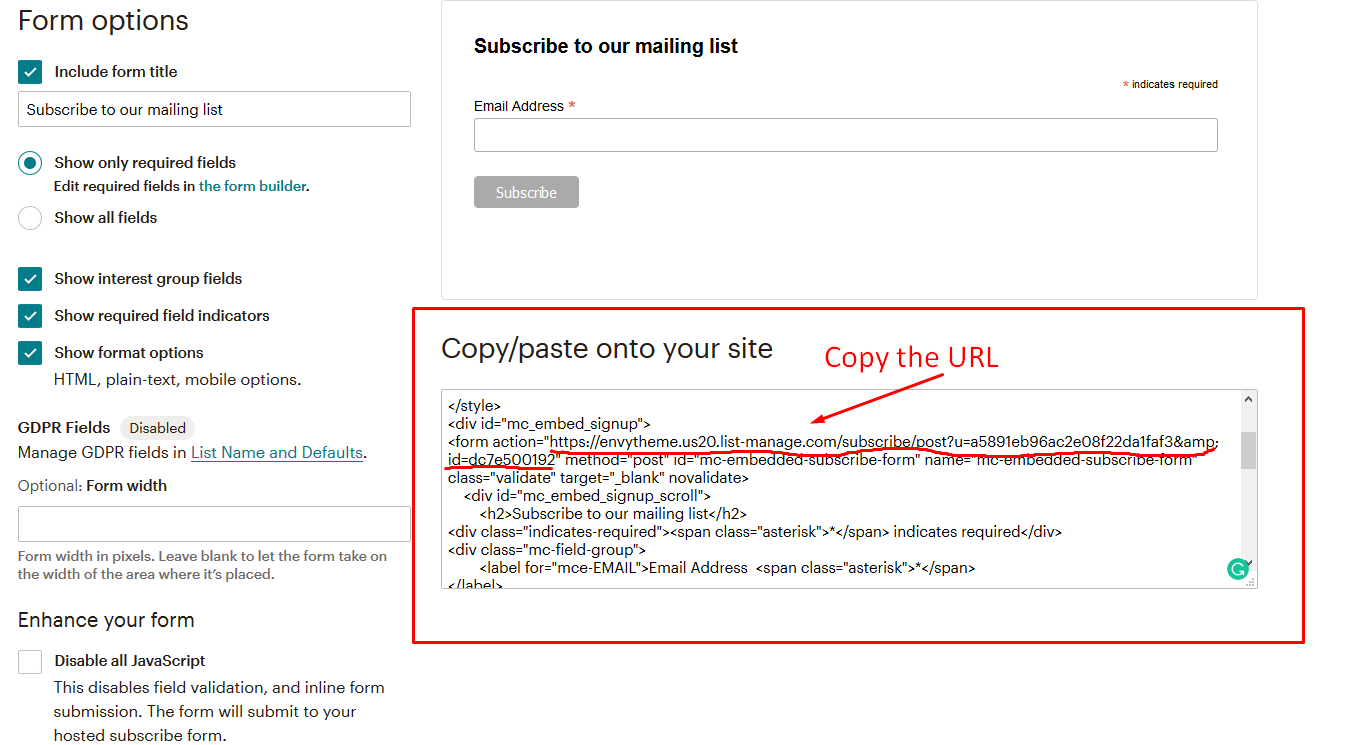
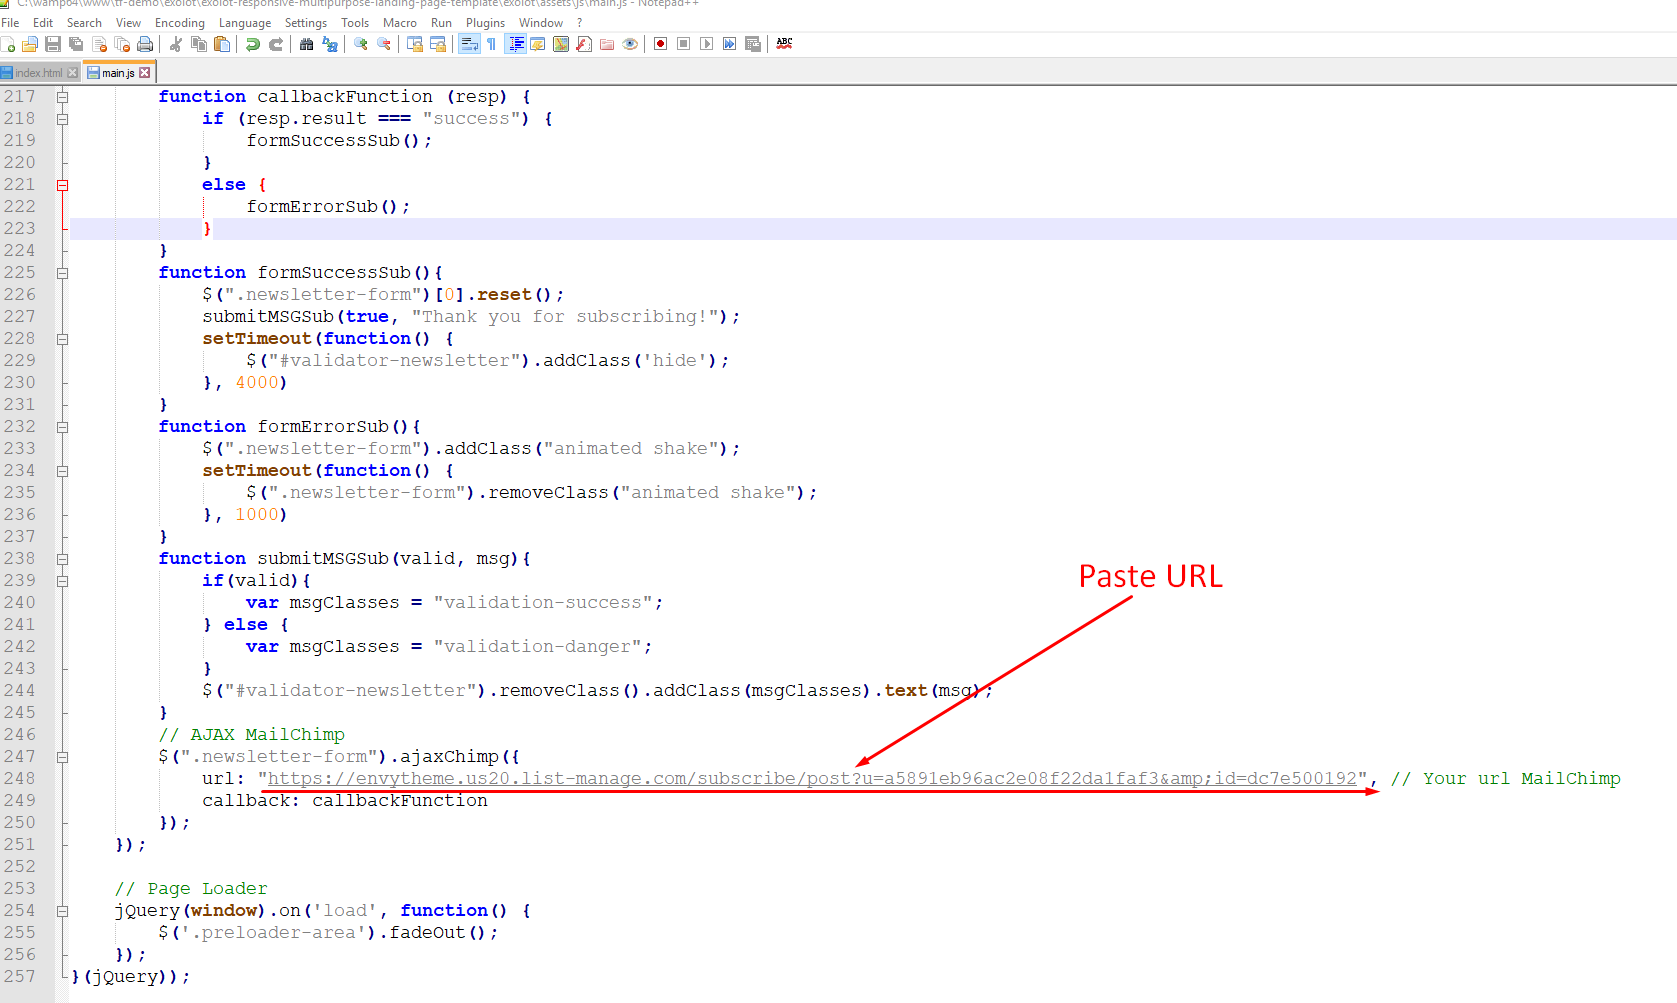
Paste URL on main.js File
Fonts Used
You can change the fonts in two ways, depending on the font types used based on the category name. Google Fonts
For example: Font code can be found in the "style.scss" file path: assets/css/style.scss
@import url('https://fonts.googleapis.com/css2?family=Inter:wght@100;200;300;400;500;600;700;800;900&display=swap');

:root {
    --fontFamily: 'Inter', sans-serif;
}
Note: It will take effect after the SCSS file is compiled. How to Run SCSS File
For example: Font code can be found in the "_variables.scss". File path: assets/scss/_variables.scss
@import url('https://fonts.googleapis.com/css2?family=Figtree:ital,wght@0,300..900;1,300..900&display=swap');

$main-font-family: "Figtree", sans-serif;
Note: It will take effect after the SCSS file is compiled. How to Run SCSS File
Main Color Change Option
You can change the colors in two ways, depending on the color styles used based on the category name.
For example: File path: assets/css/style.scss
:root {
    --mainColor: #ED2775;
}
Note: It will take effect after the SCSS file is compiled. How to Run SCSS File
For example: File path: assets/scss/_variables.scss
$primary: #EA5830;
Note: It will take effect after the SCSS file is compiled. How to Run SCSS File
How to Run SCSS File
You can change the colors in two ways, depending on the color styles used based on the category name. To apply your changes, make sure to compile the SCSS file using a tool like Sass CLI, Prepros, or a code editor with SCSS support (e.g., VS Code with Live Sass Compiler).
1. For example: Please open the file in Visual Studio Code Editor and follow this tutorial.
Here the Link: https://www.youtube.com/watch?v=0MWmv1Gvv5w
2. For example: Please open the file in Visual Studio Code Editor. Make sure node.js is available in your system.
# Install Sass globally
npm install -g sass

# Install NPM
npm install

# Watch your custom Sass for changes and compile it to CSS
npm run sass

# For Responsive
npm run responsive-sass
Note: Go to package.json file. You will find more SASS compiler command.
Swiper Slider Edit Option
Example: File path: assets/js/main.js
// Explore Category Slider JS
var SwiperTraveler = new Swiper(".explore-category-slider", {
    loop: true,
    spaceBetween: 25,
    autoplay: {
        delay: 3500,
        disableOnInteraction: false,
    },
    navigation: {
        prevEl: ".explore-prev",
        nextEl: ".explore-next",
    },
    breakpoints: {
        0: {
            slidesPerView: 1
        },
        576: {
            slidesPerView: 2
        },
        768: {
            slidesPerView: 3
        },
        992: {
            slidesPerView: 4
        },
        1200: {
            slidesPerView: 5
        },
    }
});
More Info please browser the link: Swiper Slider Docs Options
Owl Carousel Edit Option
Example: File path: assets/js/main.js
// Trusted By Slides
$('.trusted-by-slides').owlCarousel({
    nav: false,
    loop: true,
    margin: 25,
    dots: false,
    autoplay: true,
    autoplayHoverPause: true,
    navText: [
        "<i class='ri-arrow-left-s-line'></i>",
        "<i class='ri-arrow-right-s-line'></i>",
    ],
    responsive: {
        0: {
            items: 2
        },
        576: {
            items: 3
        },
        768: {
            items: 4
        },
        992: {
            items: 4
        },
        1200: {
            items: 4
        }
    }
});
More Info please browser the link: Owl Carousel Docs Options
How to Hide Scroll Animation
Please remove or comment the below code example file path: assets/js/main.js
// scrollCue
scrollCue.init();
More Info please browser the link: scrollCue Docs
Please remove or comment the below code example file path: assets/js/main.js
// AOS
AOS.init();
More Info please browser the link: AOS Docs
How to Hide GSAP Animation
Please remove or comment the below code example file path: assets/js/main.js
// Animation GSAP
function all_title_animation() {
    var tg_var = jQuery(".section-title-animation");
    if (!tg_var.length) {
        return;
    }
    const quotes = document.querySelectorAll(".section-title-animation .title-animation");
    quotes.forEach((quote) => {
        if (quote.animation) {
            quote.animation.progress(1).kill();
            quote.split.revert();
        }
        var getclass = quote.closest(".section-title-animation").className;
        var animation = getclass.split("animation-");
        if (animation[1] == "style4") return;
        quote.split = new SplitText(quote, {
            type: "lines,words,chars",
            linesClass: "split-line",
        });
        gsap.set(quote, {
            perspective: 400,
        });
        if (animation[1] == "style1") {
            gsap.set(quote.split.chars, {
            opacity: 0,
                x: "50",
            });
        }
        if (animation[1] == "style2") {
            gsap.set(quote.split.chars, {
                opacity: 0,
                y: "90%",
                rotateX: "-40deg",
            });
        }
        if (animation[1] == "style3") {
            gsap.set(quote.split.chars, {
                opacity: 0,
            });
        }
        quote.animation = gsap.to(quote.split.chars, {
            scrollTrigger: {
                trigger: quote,
                start: "top 90%",
            },
            x: "0",
            y: "0",
            rotateX: "0",
            opacity: 1,
            duration: 1,
            ease: Back.easeOut,
            stagger: 0.02,
        });
    });
}
ScrollTrigger.addEventListener("refresh", all_title_animation);
More Info please browser the link: gsap.com
Speed Optimization
Please optimize all images KB, MB also, use the image size following by placeholder file path: assets/images/..
- Tinypng
Please minify all CSS file path: assets/css/..
Please minify all JS file path: assets/js/..
How to Change Image?
Please go to the image file path assets/images/... replace the image which one you want following placeholder image size & name
How to Edit Especially For Flaticon
You won't able to add new Flaticon except existing but you can if you want to add from scratch but existing will not work and it's the feature of Flaticon. flaticon.com
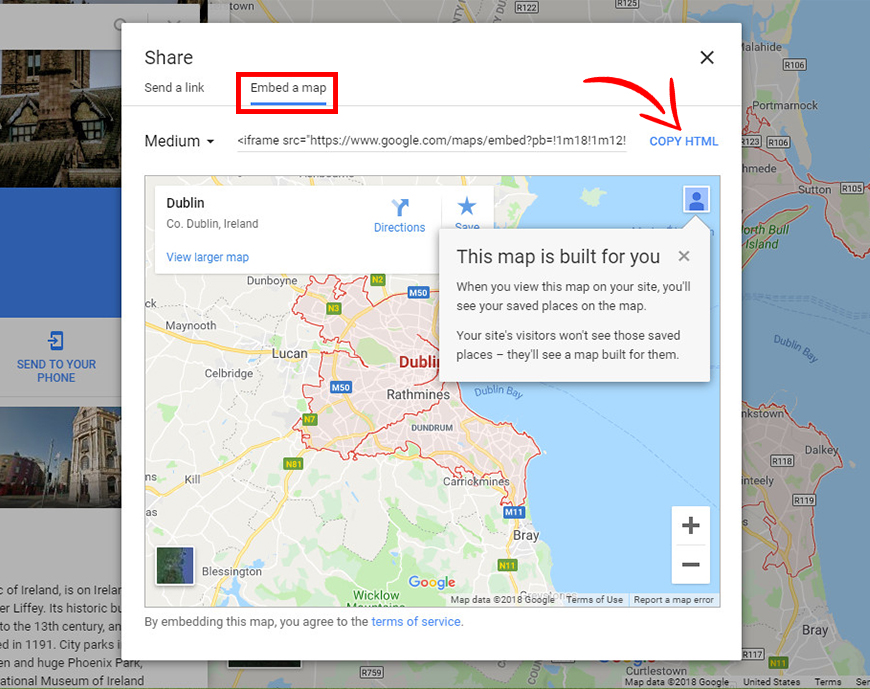
How to Add a Google Maps to The Website?
1. Please go to maps.google.com. Type the location in the search box and click on Share.
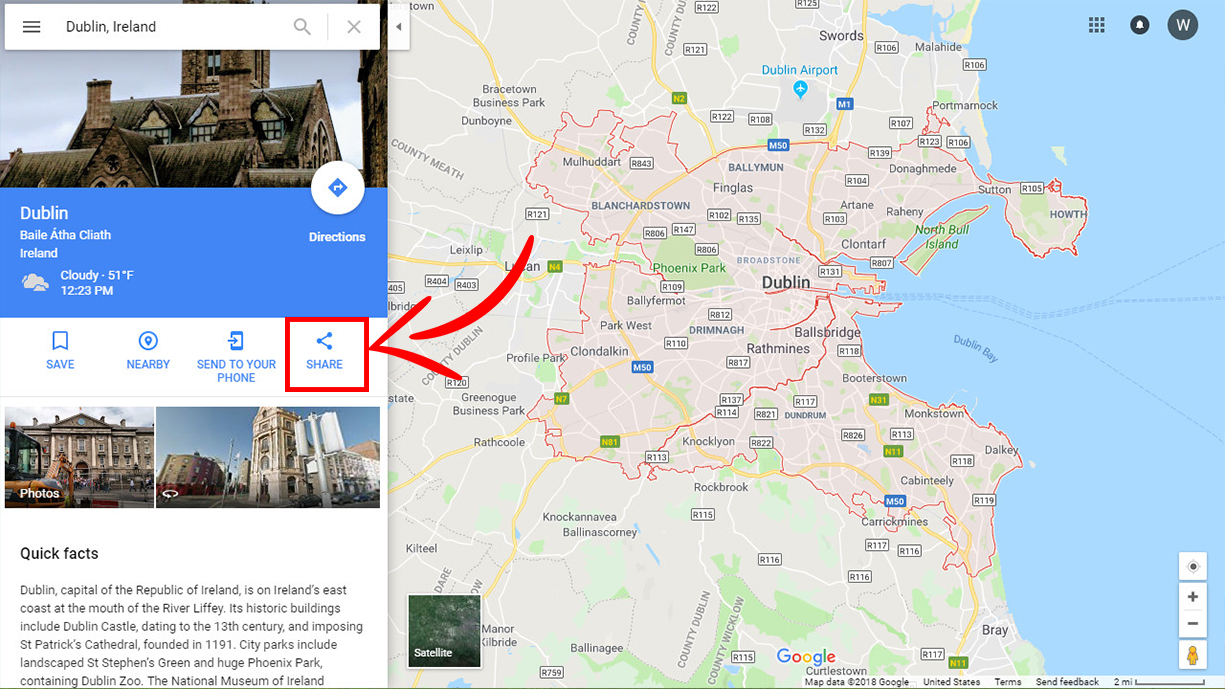
2. In the new window click on Embed a map and copy the HTML code of the map. After that add the HTML file.
How to Add New Updates of Existing Template
After a certain time, we will update our project based on the latest technology but in your template, you need to update on your own if you want.
Credits
Note: All images are used for preview purpose only and not included in the final purchase files.
Images from:
https://freepik.com/
https://pixabay.com/
https://unsplash.com/
Google Fonts:
Google Fonts
IconFont
FontAwesome
RemixIcon
Phosphoricons
Flaticon
Boxicons
IcoFont
Support
24-Hour Turnaround Support:
- Quick, Dedicated & Professional Support!
- We only provide support through our ticketing system. Please submit your ticket by visiting the EnvyTheme Support System.
- For any pre-purchase query, please use live chat on the item demo site also, email, and the item’s comment section on ThemeForest. Thanks!
Email: [email protected]